Hazardous Zone Marking: From Design to Implementation
Hazardous zone marking is a vital element of the industrial safety system at an enterprise. This article uses the example of the HSE department at the Moscow branch of JSC "NPO Poisk" to demonstrate how to prepare and successfully implement a marking project in production, and how to communicate its importance to management and all employees.
Hazardous Zone Marking (HZM) is a way to influence a worker's consciousness by modeling their behavior in the desired direction. The visualization of hazardous production zones serves as one of the elements of occupational risk management. Of course, it is worth noting that this measure is effective only when used in combination with tools such as HSE training, safety briefings, and others.
HZM helps solve a range of safety and health tasks:
- drawing employees' attention to potential hazards;
- ensuring compliance with safety rules during work;
- ensuring the safety of personnel movement across the facility;
- preventing erroneous actions by workers;
- encouraging correct actions.
Hazardous zone marking is actively used in a variety of industries, including heavy industry (metallurgy, mining, mechanical engineering), power engineering, the aviation industry, consumer goods production, the agro-industrial sector, chemical and pharmaceutical industries, logistics, and others.
To identify the interest of representatives from various industries in using hazardous zone marking, we conducted a survey. We asked colleagues to answer whether hazardous zone marking (safety marking) is used in the company where they work.
The survey results showed that only a very small number of companies use this tool comprehensively, utilizing the maximum number of HZM elements. Moreover, some respondents answered that they do not use HZM in their practice at all. The most popular type of marking is safety signs.
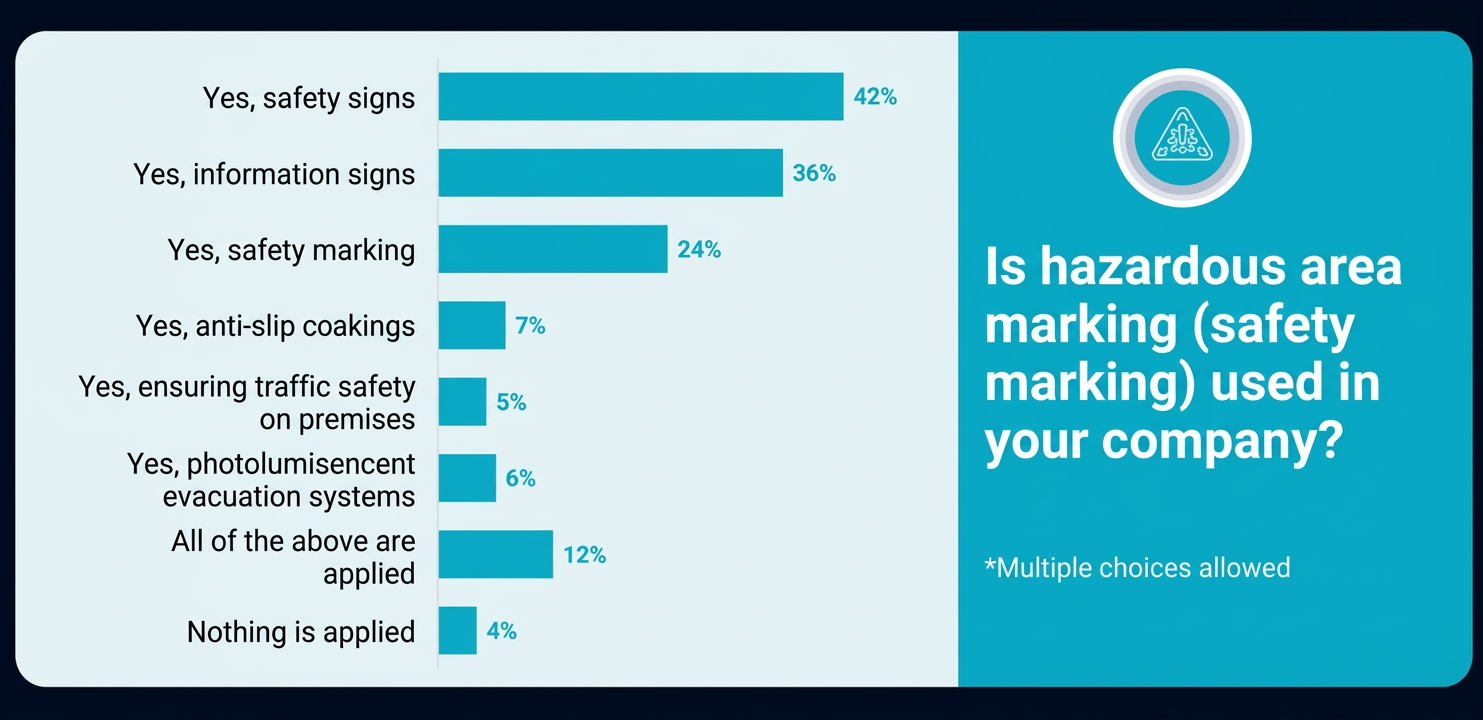 Fig. Survey results
Experience shows that when implementing a hazardous zone marking project, most specialists face the same problems. Let's highlight the main ones:
- developing design solutions and obtaining management approval;
- implementing the practical stage of the project (procurement, application of elements, etc.);
- identifying zones and areas subject to marking;
- high project budget;
- making changes to the training system (conducting additional briefings, adjusting assessment tests).
To competently solve emerging problems and anticipate questions from management, it is recommended to organize work on the project according to a specific algorithm: first determine what to mark, then how to mark it, develop floor plans and site maps, prepare "before"/"after" visuals, and think through how to communicate the necessity of following the rules to personnel.
Let's take a closer look at the described algorithm using the example of how it was implemented at NPO Poisk.
Perhaps the key question in carrying out the project is how to mark; it determines further actions and steps, as well as the motivation for the project. This issue should be approached comprehensively, so we will break our actions into six conventional steps.
Step 1 – Questionnaire.
It is necessary to conduct a survey of workers using a pre-developed questionnaire to find out where, in their opinion, hazardous zones are located and how safety measures within their radius could be improved. This will provide approximately 20% of the necessary information.
Step 2 – Studying operating instructions for equipment and materials.
This allows for obtaining another approximately 30% of the information.
Step 3 – Creating working groups.
Working groups should include representatives from various departments of the enterprise to describe equipment characteristics and types of hazards (moving mechanisms, possibility of impact, burns, etc.), analyzed areas, characteristics of production premises, working conditions (real and potential harmful and hazardous factors), and typical risks in as much detail as possible with their participation.
Step 4 – Document analysis.
It is necessary to refer to the results of previously conducted occupational risk assessments, compiled according to the hazard registry and action plan.
Step 5 – Incident analysis.
When analyzing accidents, incidents, and violations that have occurred over a long period, special attention should be paid to events that happened because workers were in a restricted zone or failed to perform actions prescribed by instructions.
Step 6 – Audit.
During the audit, it is necessary to identify storage areas, vehicle and worker movement routes, the location of work tools, fire extinguishing equipment, and equipment that requires the use of PPE.
All collected data is included in an explanatory note, which should contain:
- information on technical safety solutions to be included in the project in accordance with GOST 12.4.026 requirements;
- information on installation methods (where and at what height safety elements will be placed, placement principles, what fasteners will be used);
- information on the method for determining the placement height and dimensions of safety elements;
- information on manufacturing requirements and methods, and materials used for making safety elements.
Before moving on to the graphical part of the project, it is very important to define how to mark hazardous zones. To avoid disagreements and contradictions in various production departments, a unified conceptual framework must be introduced — a standard that fixes the appearance of the marking.
To determine the appearance of the marking, HZM elements, and signal colors, the designations fixed in GOST 12.4.026-2015 "Interstate Standard. Occupational safety standards system. Signal colors, safety signs and safety marking. Purpose and rules of application. General technical requirements and characteristics. Test methods" are used (Table).
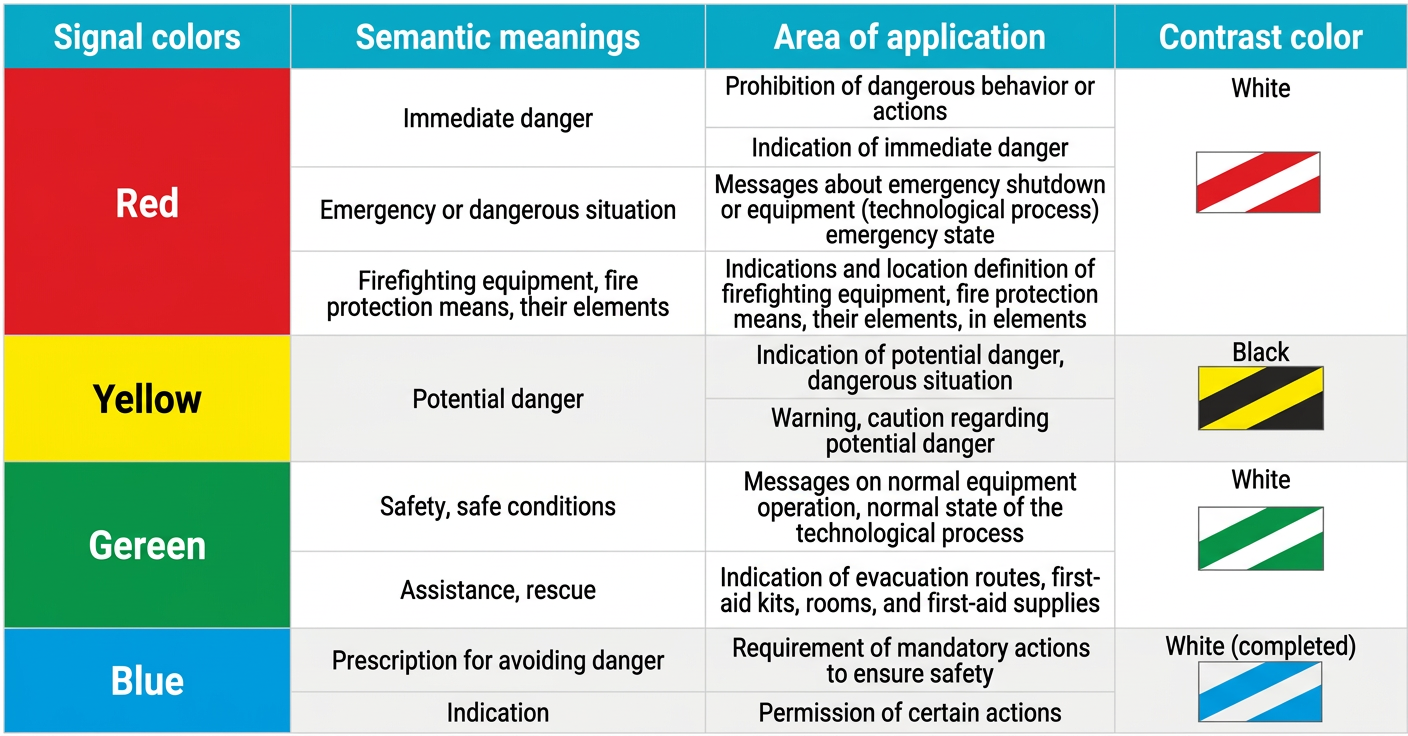 Table. Elements of hazardous production zone marking
Safety signs are recommended to be placed so that they are always in the field of vision of the people for whom they are intended. At the same time, signs should not distract attention while performing work.
Vertical marking is used for narrow passages, columns, and protruding structures. Reflective and photoluminescent materials, as well as materials with contrasting colors, are used. Horizontal safety marking is applied to the floors of production and warehouse premises, allowing for the separation of transport and pedestrian flows and the convenient and safe storage of materials. Horizontal marking can warn of hazards to be avoided and indicate evacuation routes in case of an emergency.
Overall, placing HZM elements is the simplest and most effective way to warn of danger, prohibit erroneous actions, or indicate the need for correct actions.
The choice of materials and installation methods must also be justified. For this, the following criteria must be considered:
- cost of materials and installation (calculation, technical specifications, estimate);
- testing;
- manufacturability;
- durability;
- safety/eco-friendliness;
- operating conditions.
Once we have determined exactly what needs to be marked and fixed the types of marking, we move on to the graphical part of the project.
The graphical part of the project displays the following:
- layout drawings and diagrams of production premises and the territory (the plan-diagram can be done in 2D graphics);
- placement schemes for safety elements, technical solutions, and markings;
- standard drawings of methods for fastening safety elements, taking into account the height level and placement pitch of elements and markings, and permissible marking offsets considering regulatory documents and fire safety requirements.
The figure shows an example of a production premises plan-diagram made in 2D format.
 Fig. Production premises plan-diagram
The marking project can display not only production areas but also the enterprise territory as a whole. In addition to the traditional designation of production premises, smoking areas, parking lots, administrative buildings, and traffic patterns, areas where personal protective equipment (PPE) is required must be marked. These signs will also be placed on doors before entering a hazardous zone. An example of an enterprise scheme considering the marking project is shown in the figure below.
After the preparation of the project, considering all the listed aspects, is complete, another important question arises: how to get management support?
A convincing and visual presentation of the project can help solve this issue. To achieve visual impact, include "before" and "after" photos of the marking application. The photos should clearly present the benefits of project implementation, reflecting both the new organization of space and the safety of workers in various workshops and departments of the enterprise.
The presentation should clearly state the advantages of project implementation, including the possibility of phased implementation, visualization of hazardous areas, standardization (bringing designations to a unified form), a significant contribution to the risk management system, and changes in workers' attitudes toward safety issues.
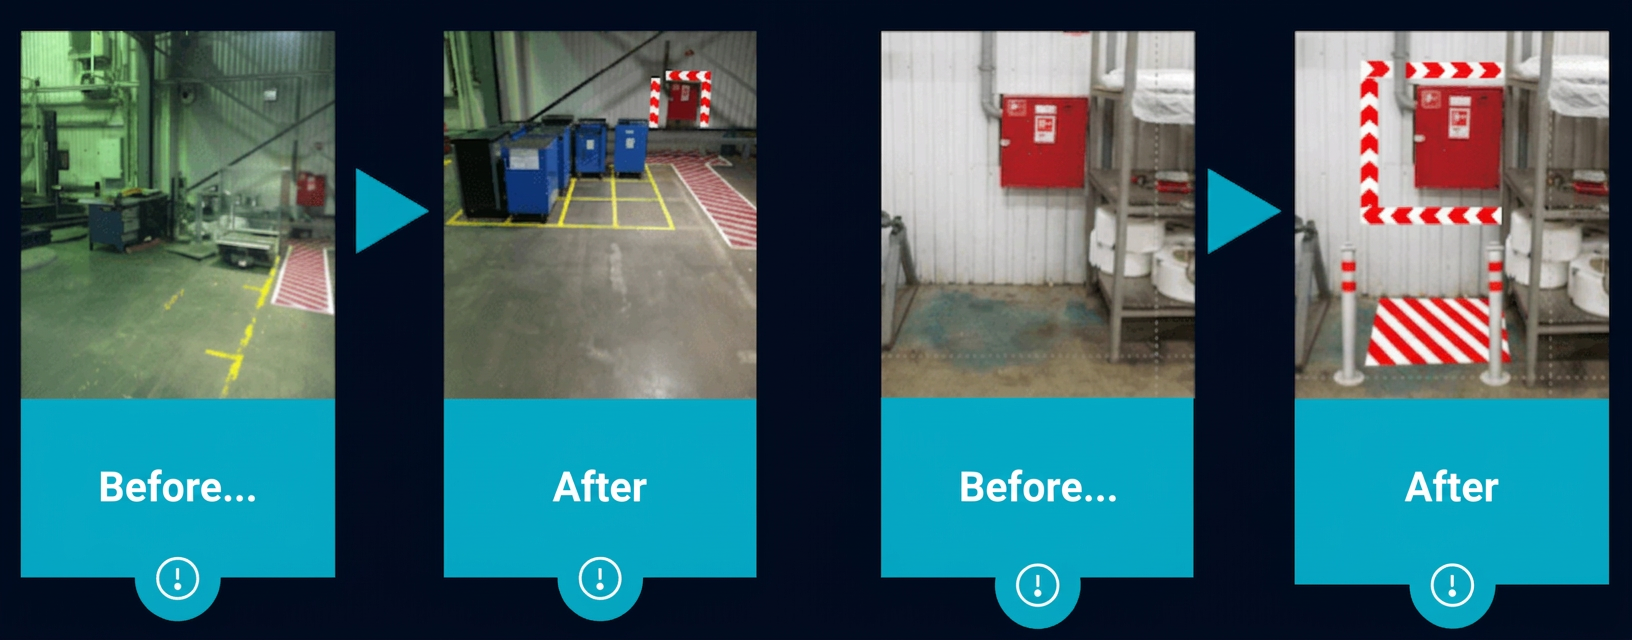 Fig. Presentation example.
Before implementing the project, it is necessary to think about how information about hazardous zone marking will be communicated to employees. It is necessary to form a habit of correct actions regarding hazardous zones in workers. Both a traditional approach and a less formal one are possible here.
Training, conducting marking workshops, and placing stands with HZM elements equipped with a QR code system in prominent places provide a good effect. This makes it possible to access safety rules via a smartphone at any time.
Another non-standard solution in this regard is gamification — conducting special games to memorize the location of markings and rules for safe behavior in hazardous zones.
During the project implementation process, it may be refined. Direct contact with workers and their comments regarding hazardous zone marking provide invaluable help in this regard. One must also not forget that markings become dirty and wear off over time, so they must be updated in a timely manner.